

Scheduled Fargate Task example in AWS CDK
After reading this blog post, you'll learn how to build a Scheduled Fargate Task with AWS CDK


This blog post will explain what is required to create a scheduled Fargate task in AWS CDK, see the diagram below.
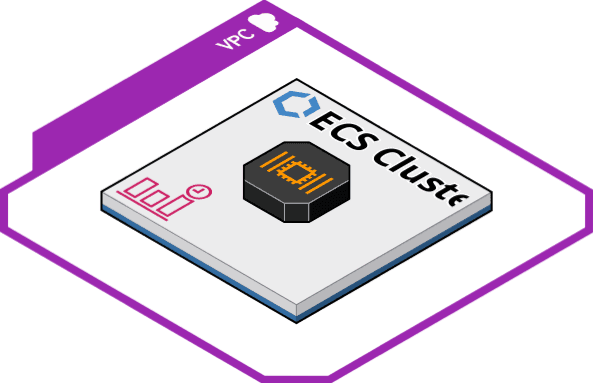
The following components will be built:
- Prerequisite: Create a VPC
- Prerequisite: Create a Cluster
- Create a Scheduled Fargate Task in AWS CDK
- TL;DR just give me the Scheduled Fargate Task code!
- Conclusion
Prerequisite: Create a VPC
To start using Scheduled Fargate Tasks, you first need to set up a virtual private cloud (VPC). A VPC is a logically isolated virtual network that allows you to launch your AWS resources such as Scheduled Fargate Tasks.
You can specify an IP address range for the VPC, add subnets, associate security groups, and configure route tables. For this blog post, we'll create a VPC with 9 subnets divided over 3 Availability Zones (AZ's) in AWS CDK.
The following shows an example of how to create a VPC:
// Create a VPC with 9x subnets divided over 3 AZ's
const myvpc = new ec2.Vpc(this, 'SkeletonVpc', {
  cidr: '172.31.0.0/16',
  natGateways: 1,
  maxAzs: 3,
  subnetConfiguration: [
    {
      cidrMask: 20,
      name: 'public',
      subnetType: ec2.SubnetType.PUBLIC,
    },
    {
      cidrMask: 20,
      name: 'application',
      subnetType: ec2.SubnetType.PRIVATE_WITH_NAT,
    },
    {
      cidrMask: 20,
      name: 'data',
      subnetType: ec2.SubnetType.PRIVATE_ISOLATED,
    },
  ],
});
Prerequisite: Create a Cluster
Once the VPC is built, we can create the EC2 Cluster that manages our scheduled tasks. The following code snippet allows us to create the EC2 Cluster:
// Create an ECS cluster
const cluster = new ecs.Cluster(this, 'service-cluster', {
  clusterName: 'service-cluster',
  containerInsights: true,
  vpc: vpc,
});
As you can see in the snippet we reference the myvpc. This tells AWS CDK to deploy the ECS Cluster in the VPC we created earlier.
Create a Scheduled Fargate Task in AWS CDK
Once we've deployed the dependent resources, we can continue with the actual Fargate resource. The next snippet uses the official CDK Construct library for higher-level ECS Constructs (aws-ecs-patterns) to create the Scheduled Fargate Task:
// Create a Fargate container image
const image = ecs.ContainerImage.fromRegistry('amazonlinux:2');

// Create higher level construct containing a scheduled fargate task
new ecspatterns.ScheduledFargateTask(this, 'amazon-linux-sleep-task', {
  schedule: events.Schedule.cron({
    minute: '0',
    hour: '13',
    day: '*',
    month: '*',
  }),
  cluster: cluster,
  platformVersion: ecs.FargatePlatformVersion.LATEST,
  scheduledFargateTaskImageOptions: {
    logDriver: ecs.LogDrivers.awsLogs({
      streamPrefix: id,
      logRetention: logs.RetentionDays.ONE_YEAR,
    }),
    image: image,
    command: ['sh', '-c', 'sleep 5'],
    environment: {
      APP_NAME: id,
    },
    memoryLimitMiB: 1024,
    cpu: 256,
  },
});
Let's explain what has been built.
new ecspatterns.ScheduledFargateTask, here we instantiate the Scheduled Fargate Task resource from the ecspatterns library. We reference the cluster we created in the previous section to let AWS CDK know where to deploy the Scheduled Fargate Task.
In the scheduledFargateTaskImageOptions we define the details for the container such as the image. We create the image from the asset folder in our project by doing: const image = ecs.ContainerImage.fromRegistry('amazonlinux:2');. AWS CDK will automatically pull the Amazon Linux 2 image from Amazon ECR and use that to deploy the scheduled Fargate task.
You can specify a retention rate for your logs. By default, AWS CDK doesn't set any retention rate on the logs created by its tasks. If you want to have a retention rate for your logs, you will need to set retention with the logRetention property on the logDriver. The value logs.RetentionDays.ONE_YEAR, sets the retention for one year before the logs get deleted from this scheduled Fargate task.
command specifies what task you want to run on the container. After the command has finished, the Fargate task will stop running.
environment allows you to import environment variables in the container that can be used for your Fargate task.
memoryLimitMiB sets the memory limit of your Fargate task, the default is 512MB
cpu sets the number of cpu units that are used by the Fargate task, the default is 256.
TL;DR just give me the Scheduled Fargate Task code!
If you just need the code, then you can find the full working example on my GitHub repository
Conclusion
So to finish up we've:
- Created a VPC
- Created an ECS Cluster
- Created a Scheduled Fargate Task
Using higher-level constructs or so-called patterns, such as the aws-ecs-patterns we've used in this example does a lot of the heavy lifting in creating a lot of AWS resources and including sensible defaults. Using these patterns can save a lot of "Development" time but it might mean you have less customizability because of the sensible defaults.
👋 Enjoyed this article? Reach out in the comments below or on Twitter to let me know what you think of it.
If you found some value in reading this, please consider showing your support by sponsoring me. Thanks to your support, I'm able to continue doing what I enjoy the most, which is sharing my learnings with the Cloud Community. Donate here 👇